
Car radio installers spend a reasonable amount of time identifying and matching the wiring harnesses.
And for a good reason. Any carelessness in this stage can cause you to pair two different radio wires, resulting in the car radio not working correctly. Or not work at all in rare cases.
To help you out, we have been compiling wiring diagrams and color codes for different car radios for some time. This includes JVC car radio diagrams, Nissan car radio diagrams, Ford car radio diagrams, and Pioneer car radios.
Keeping up with the tradition, we’re listing diagrams for Kenwood car radios today.
Kenwood KMM-BT328U Wiring Diagram

| Wire | Type | Polarity | Color |
|---|---|---|---|
| Constant 12V wire | Power | + | Yellow |
| Switched 12V wire | Power | + | Red |
| Ground wire | Grounding | – | Black |
| Mute control wire | Brown | ||
| Power/Antenna control wire | Amplifier | Blue/White | |
| Steering remote control wire | Light Blue/Yellow | ||
| Left front speaker wire | Speaker | + | White |
| Left front speaker wire | Speaker | – | White/Black |
| Right front speaker wire | Speaker | + | Gray |
| Right front speaker wire | Speaker | – | Gray/Black |
| Left rear speaker wire | Speaker | + | Green |
| Left rear speaker wire | Speaker | – | Green/Black |
| Right rear speaker wire | Speaker | + | Purple |
| Right rear speaker wire | Speaker | – | Purple/Black |
Kenwood KDC-BT282U Wiring Diagram

| Wire | Type | Polarity | Color |
|---|---|---|---|
| Constant 12V wire | Power | + | Yellow |
| Switched 12V wire | Power | + | Red |
| Ground wire | Grounding | – | Black |
| Mute control wire | Brown | ||
| Power/Antenna control wire | Amplifier | Blue/White | |
| Steering remote control wire | Light Blue/Yellow | ||
| Left front speaker wire | Speaker | + | White |
| Left front speaker wire | Speaker | – | White/Black |
| Right front speaker wire | Speaker | + | Gray |
| Right front speaker wire | Speaker | – | Gray/Black |
| Left rear speaker wire | Speaker | + | Green |
| Left rear speaker wire | Speaker | – | Green/Black |
| Right rear speaker wire | Speaker | + | Purple |
| Right rear speaker wire | Speaker | – | Purple/Black |
Kenwood DDX5707S And DMX4707S Wiring Diagram
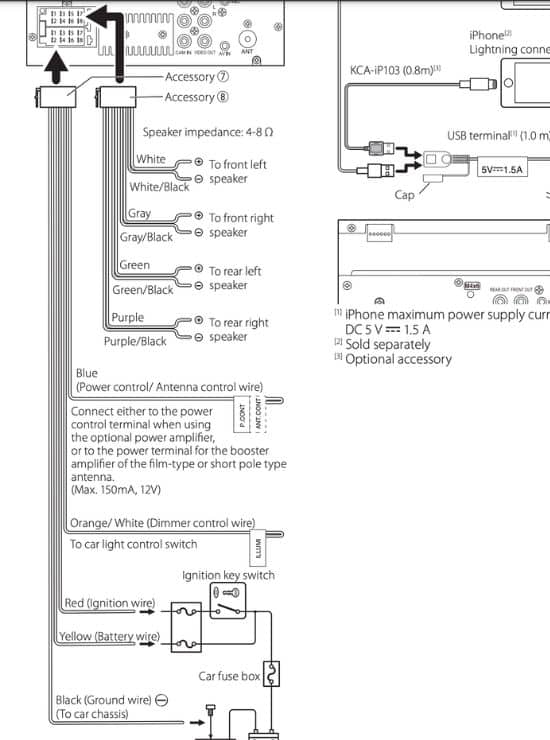
| Wire | Type | Polarity | Color |
|---|---|---|---|
| Constant 12V wire | Power | + | Yellow |
| Switched 12V wire | Power | + | Red |
| Ground wire | Grounding | – | Black |
| Dimmer control wire | Orange/White | ||
| Power/Antenna control wire | Amplifier | Blue | |
| Left front speaker wire | Speaker | + | White |
| Left front speaker wire | Speaker | – | White/Black |
| Right front speaker wire | Speaker | + | Gray |
| Right front speaker wire | Speaker | – | Gray/Black |
| Left rear speaker wire | Speaker | + | Green |
| Left rear speaker wire | Speaker | – | Green/Black |
| Right rear speaker wire | Speaker | + | Purple |
| Right rear speaker wire | Speaker | – | Purple/Black |
Kenwood DMX7706S, and DMX706s Wiring Diagram
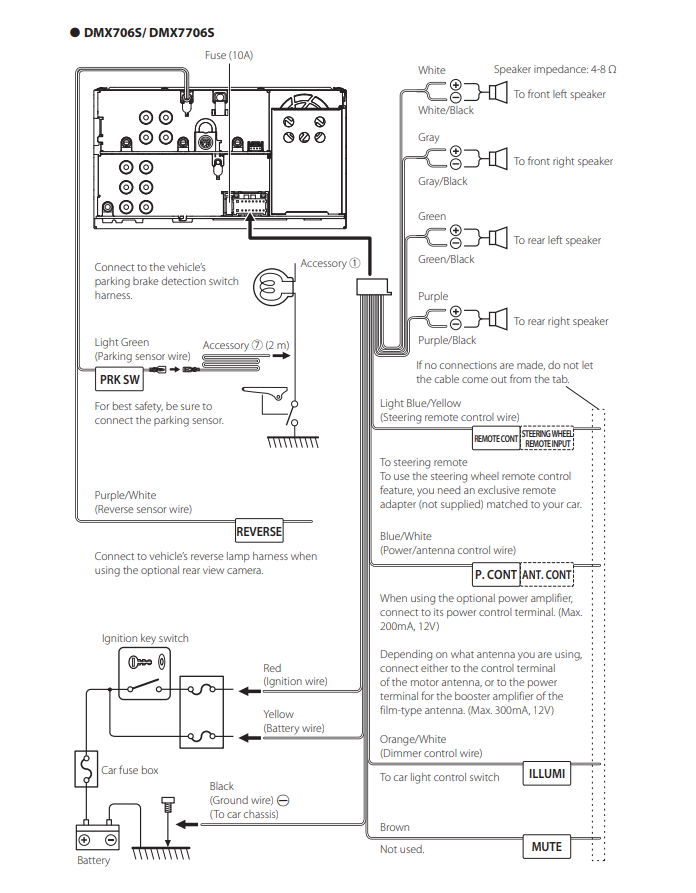
| Wire | Type | Polarity | Color |
|---|---|---|---|
| Constant 12V wire | Power | + | Yellow |
| Switched 12V wire | Power | + | Red |
| Ground wire | Grounding | – | Black |
| Dimmer contril wire | Orange/White | ||
| Mute control wire | Brown | ||
| Power/Antenna control wire | Amplifier | Blue/White | |
| Steering remote control wire | Light Blue/Yellow | ||
| Reverse sensor wire | Purple/White | ||
| Parking sensor wire | Light Green | ||
| Left front speaker wire | Speaker | + | White |
| Left front speaker wire | Speaker | – | White/Black |
| Right front speaker wire | Speaker | + | Gray |
| Right front speaker wire | Speaker | – | Gray/Black |
| Left rear speaker wire | Speaker | + | Green |
| Left rear speaker wire | Speaker | – | Green/Black |
| Right rear speaker wire | Speaker | + | Purple |
| Right rear speaker wire | Speaker | – | Purple/Black |
Kenwood DPX5200BT Wiring Diagram
| Wire | Type | Polarity | Color |
|---|---|---|---|
| Constant 12V wire | Power | + | Yellow |
| Switched 12V wire | Power | + | Red |
| Ground wire | Grounding | – | Black |
| Mute control wire | Brown | ||
| Power/Antenna control wire | Amplifier | Blue/White | |
| Steering remote control wire | Light Blue/Yellow | ||
| Left front speaker wire | Speaker | + | White |
| Left front speaker wire | Speaker | – | White/Black |
| Right front speaker wire | Speaker | + | Gray |
| Right front speaker wire | Speaker | – | Gray/Black |
| Left rear speaker wire | Speaker | + | Green |
| Left rear speaker wire | Speaker | – | Green/Black |
| Right rear speaker wire | Speaker | + | Purple |
| Right rear speaker wire | Speaker | – | Purple/Black |
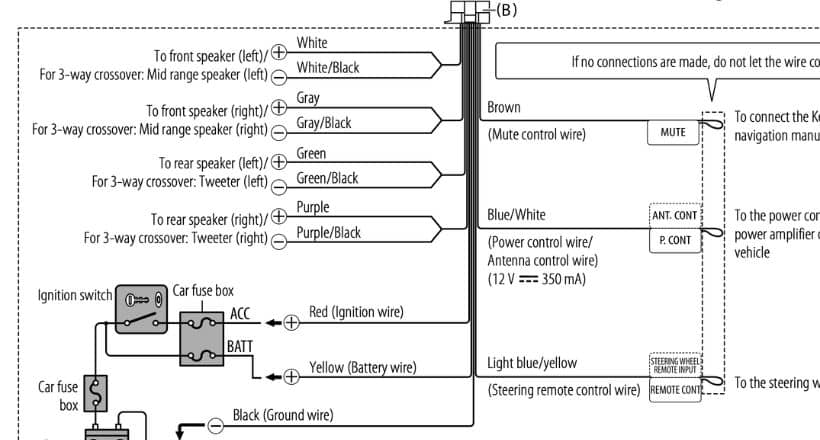
Kenwood 16-pin and 22-pin Wiring Diagram
Below are the standard diagrams for Kenwood radios with 16-pin and 22-pin wiring harnesses.


Conlcusion
So these were the wiring diagrams and color codes for some popular Kenwood car radios.
These radios mostly come with the same color coding, making the radio installation/diagnosis much more straightforward.
However, some wires, such as power antenna wire, dimmer control wire, etc., can be colored differently. Therefore, always double-check the information listed above with the owner’s manual.
Related Posts
- Car Stereo Wire Colors Code| Car Stereo Wiring Diagram
- Ford Stereo Wiring Color Code & Diagrams
- Pioneer Wiring Harness Color Code and Wiring Diagram
- How to wire a Car Stereo without Wiring Harness Adapter
- How to Connect Bluetooth to Kenwood Stereo
- 5 Easy Ways to Fix Kenwood CD player out of Protect mode