
Pioneer Wiring Harness Color Code for DEH, MVH and AVH-X Models

Yellow Wire: Memory Functions
The yellow wire is the unsung hero behind the scenes, responsible for keeping your receiver’s memory functions intact. From the trusty clock to your favorite radio station presets and audio settings, it’s all thanks to this little wire. But, if you’re finding that your clock and presets constantly reset when you turn off your vehicle, it’s time to check that yellow wire connection.
This wire needs a steady power supply from your vehicle to do its job. To put it to the test, make sure the key is out of the ignition or switch the on/off switch to the “off” position. Grab your voltage meter, and let’s measure the voltage on that yellow wire. It should consistently read 12 volts, no matter the ignition or switch position.
Must Check this Post – Top 7 Best Pioneer Car Stereos in 2023
Red Wire: Ignition Control
The red wire, under the control of the vehicle’s ignition or on/off switch, comes to life when the engine roars to life. It holds the power of 12 volts, sparking alive only when the vehicle springs to action. This mighty wire ensures that the receiver receives the life force it needs when the vehicle is in motion.
Orange Wire with White Stripe: Illumination Control
The orange and white wire serves as a switch to automatically dim the illumination on the in-dash receiver when the vehicle’s headlights are switched on. This feature allows drivers to drive without needing to worry about the brightness of their dashboard display during night time hours, while still being able to appreciate its full functionality during the day. In addition, many in-receivers also have an illumination timer that can dim the illumination automatically based on the time of day, which is another great feature to ensure optimal brightness levels. It is important to properly terminate the end of this wire so it does not come into contact with other wires or metal in the vehicle.
Black Wire: Ground Connection
The black wire serves as the trusty ground wire, ensuring a solid connection with the vehicle’s body or frame. A proper ground link is crucial for the seamless operation of the receiver. Let’s keep the power flowing!
Blue Wire with White Stripe: System Remote Control
The blue wire with a white stripe plays a vital role in the operation of external amplifiers, power antennas, and other connected devices. It’s like the conductor of a symphony, allowing these devices to gracefully switch on when the receiver powers up. Whether connected directly or through a third-party relay, devices hooked up to this wire will stay powered on when the receiver is active and gracefully shut down when the receiver is turned off. It’s the secret behind seamless audio experiences!.
Yellow and Black Wire – Mute
The yellow and black wire is a special wire that is used in car audio systems to temporarily mute the music from the in-receiver when an external device needs to send out a signal. This allows for clear communication between devices or through a third-party adapter. It also ensures that the music will not interfere with any command received by the driver. When this wire is not being used, it should be properly terminated in order to avoid contact with other wires or metal. The yellow and black wire can also be used in special installations that require the music to be muted when a command needs to be heard by the driver.
Purple and White Wire – Backup Camera Connection
The purple and white wire is used for connecting a reversing camera to the vehicle. This connection enables the in-receiver system to determine whether the vehicle is in its reverse gear or not. When the vehicle switches to its reverse, this wire sends a voltage change signal which allows an optional backup camera to be switched on or off automatically. It can also be used as a ground feed if required by the installation. Not all installations require this wire and so it is important to make sure that any unused ends are properly terminated in order to avoid contact with other wires or metal inside the vehicle. This ensures that no electrical shorts occur.
Light Green Wire – parking brake
The light green wire is used to connect to the parking brake switch in order to enable certain functions on the receiver. These functions include being able to watch video and perform other selected operations. It is important that this connection be made in an “on-off” fashion, which means that if you find certain buttons are grayed out, engaging the parking brake will enable the activation of these buttons.
Speaker Wire
The wire harness is like a symphony of connections, with multiple pairs of speaker leads. Each pair dances together, one with a solid color wire (positive) and its partner adorned with a black stripe (negative). These harmonious connections are crafted for both front and rear speaker outputs, bringing your audio experience to life. Pioneer receivers are versatile maestros, capable of operating in standard mode for a classic sound or network mode for more advanced setups.
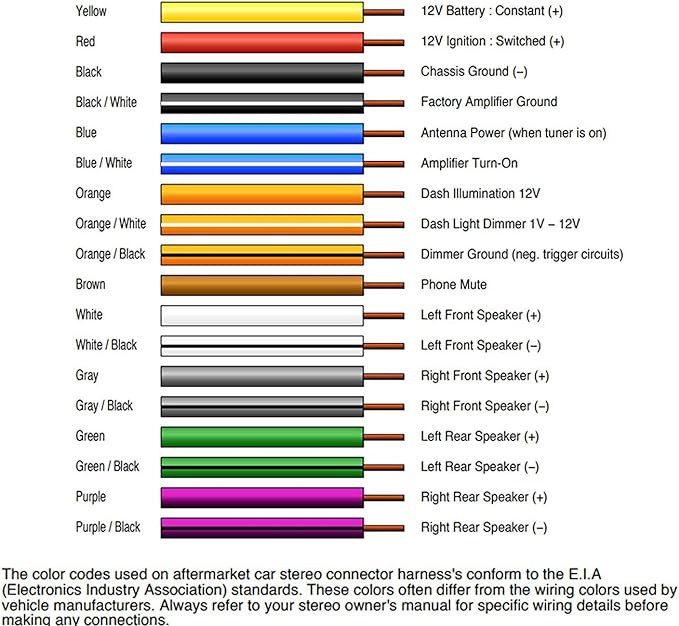
Here are the color codes for the speaker leads:
- White: Left front speaker (standard mode) / Left high (network mode)
- Gray: Right front speaker (standard mode) / Right high (network mode)
- Green: Left rear speaker (standard mode) / Left mid-range (network mode)
- Purple: Right rear speaker (standard mode) / Right mid (network mode)
Note: Pioneer receivers are made to harmonize with speakers ranging from 4 to 8 ohms impedance. But wait, there’s more! Certain receivers even offer the flexibility to configure the rear speaker output, granting you the power to unleash the captivating bass of a small subwoofer.
Must Check this Post – How much does It Cost To Install A Car Stereo?
If you are installing a car stereo, it is important to use the proper wiring harness for your particular model. Incorrect wiring can damage your car’s electronics.
Pioneer avh-120bt Wiring harness Color Code

16 Pin Pioneer Wiring Harness Color code
Pioneer Head Unit Wiring Diagram
If you’re looking to install a new car stereo or head unit, you’ll need to know how to wire it up. Luckily, there’s a standard set of colors used for most car stereos and head units. By following this wiring diagram, you can easily connect your new Pioneer Double Din head unit to your car’s existing electrical system.

Must Check this Post – How to wire a Car Stereo without Wiring Harness
FAQs
Why is this color code important?
The wiring harness color code is important because it helps you connect the proper wires to the correct terminals on your car stereo. Incorrect wiring can damage your car’s electronics. If you are unsure about which harness to use, consult an expert car stereo installer.
How can you use this color code to your advantage?
If you are installing a car stereo, use the proper wiring harness for your particular model. Incorrect wiring can damage your car’s electronics. If you are unsure about which harness to use, consult an expert car stereo installer.
The proper installation of a car stereo is critical to its performance and longevity. Use the correct harness, and follow the instructions in your car stereo’s instruction manual, to ensure a successful installation.
What are some tips for Pioneer wiring harness installation?
There are a few things to keep in mind when installing a Pioneer wiring harness:
1. Make sure you use the correct wiring harness for your particular model. Incorrect wiring can damage your car’s electronics.
2. Follow the instructions in your car stereo’s instruction manual to ensure a successful installation.
3. The proper installation of a car stereo is critical to its performance and longevity. Use the correct harness, and follow the instructions in your car stereo’s instruction manual, to ensure a successful installation.
4. If you are unsure about which harness to use, or have any other questions about the installation process, consult an expert car stereo installer.
Also Check – How to Wire a Car Stereo from Scratch?
How can you troubleshoot Pioneer wiring harness problems?
If your Pioneer stereo is not working properly, there could be a problem with the wiring harness. Here are some tips on how to troubleshoot wiring harness problems:
1. Check all of the connections and make sure they are secure.
2. Inspect the wires for any signs of damage.
3. Make sure that the stereo is properly grounded.
4. If you are using an aftermarket stereo, make sure that it is compatible with your vehicle.
5. Check the fuse to make sure that it is not blown.
6. Try resetting the stereo by disconnecting the battery for a few minutes.
7. If none of these tips solve the problem, then you may need to replace the wiring harness.